Adding, Updating, Copying and Deleting Pages
Introduction to the My Website module
My Website is a web application that gives you a simple and friendly way to manage your website content. It has the following features:
- create and delete web pages
- preview pages
- edit web page content
- restore older versions of web page content
- maintain a library of images
- switch graphic design themes
- reconfigure the website name and description
- update your password
For small websites, these features encompass 95% of your daily website management tasks. When more advanced content management features are required, check out the Website Manager web application instead.
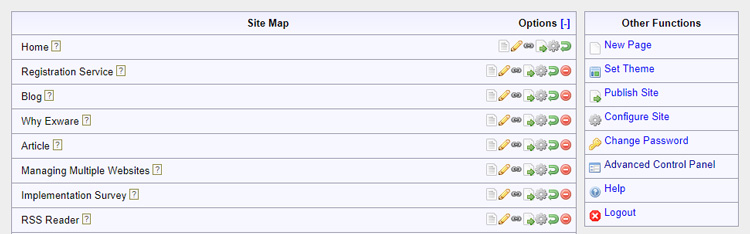
Browsing and previewing pages
Your pages are listed on the left-hand side of the screen. They are shown in the form of a site map, which is to say the order and nesting reflects the order and nesting in your website menus. The submenus are collapsible; if you see small arrows along the left side, you can click these to expand/collapse that part of the site map. When you expand a part of the site map to view the next level of menu, there may be additional sub-levels of menu that can be expanded and collapsed in the same way.
Each page is listed using its menu label, which is how the page
is normally labeled for a website visitor. Mouse over the info hotspot [?]
to view additional information about the page and its configuration. Most
of these settings can be changed using the Configure Page
button, ![]() .
.
If you have a multilingual site, some pages may be tagged with a
flag ![]() . These are alternate-language versions of
the page they are nested under.
. These are alternate-language versions of
the page they are nested under.
To preview your web pages, use the preview icon, ![]() .
.
The page will pop up in a new window. As the site administrator, you will see the editable region of content highlighted by a dashed red line. At the bottom of the editable region is an edit button. Click this button to edit the content you see. (Regular website users will not see the dashed line or edit button.)
To return to the website control panel, simply close the preview window.
Creating new pages
To add a new page to your site, click on the new page icon, ![]() .
.
The only information you will need to provide is a menu label for the new page. ExSite will use this label when it creates menu links to this new page. Click on the "Submit" button to create the page. Note that this does not publish the page, so the public will still not be able to view the page. First you must edit the page and then publish it.
If the page requires any special configuration, you can use the page configuration tool after the page is created.
Editing pages
There are two ways to edit a web page:
- click on the edit icon
 in the control panel.
 - preview the page, and then click on the edit button
 at the bottom of the page.
In either case, the web page is displayed in a separate window, with the content region replaced by a full HTML editor, which you can type into to make your changes.
Do not click reload, or navigate away from the page while editing, or your changes so far will be lost.
When done making changes, click on the "Submit" button below the editor. This will return to the page preview, and you should be able to see your new changes. If everything looks good, close the browser window, and you should find yourself back at your website control panel.
Wysiwyg editor
The WYSIWYG (What you see is what you get) editor is a content, editing tool that gives the user a representation of what the end result will look like.
For more information, see Using the HTML Editor
Copying pages
When a duplicate page is created, a new URL is added to the website, leaving your visitors unsure of which of the two pages to view. Instead of creating a new page, copy and paste the existing page contents into a Word document, edit the contents, and then copy the new edits back into the existing page. This prevents issues with URL's, 404 errors, and Google rankings.
To note: Web page revisions are saved into the system so you can back-track to an earlier edit if necessary.
Deleting pages
To remove a pages from your site completely, click on the delete
tool, ![]() .
.
Note that you cannot delete your home page, since that page is required in order for the site to function properly. To replace this page, simply edit its content or reconfigure it's menu label.
Deleted pages are moved to the trash bin temporarily. If you accidentally delete a web page when you shouldn't have, it can be recovered from the trash (in the Advanced Control Panel). If you do not have access to the trash bin, contact the system administrator.
Publishing pages
All your edits and modifications are stored in a database until you are ready to commit them. When you are ready to go public with your changes, click on the publish button. This will write out your web page files.
You can publish web pages individually, using the publish button
![]() in the web page's
listing. (These are in the extra page tools, which you can find by
clicking on the [+] symbol by "Options".) You can also publish
all of your sites pages and files at once, using the "Publish Site"
option in the right-side menu.
in the web page's
listing. (These are in the extra page tools, which you can find by
clicking on the [+] symbol by "Options".) You can also publish
all of your sites pages and files at once, using the "Publish Site"
option in the right-side menu.