Website Manager Module
Introduction
The website manager is the application that is used for:
- managing (creating and deleting) sites
- managing pages, templates, and content libraries
- updating content (by editing or uploading new revisions)
- revision management
- publishing
- inserting dynamic content into pages
This document serves as a guide to the various site editing features contained within the Website Manager.
Contents
- Getting Started
- Overview of the Website Manager
- Content Structure
- Editor Views
- Top View
- Website View
- To open a page, template, or library, to work on its content
- To view a structured site map instead of the icon view
- To change the site configuration
- To delete a whole site
- To create a new website that is a child of this website
- To create a new web page
- To create a new library
- To create a new template
- To change all pages in the site to a different template
- To publish the site
- Page View
- To preview this page
- To update a particular content element
- To add a new content element
- To publish this page
- To change this page to a different template
- To change this page to use a preconfigured body
- To jump to the template used by this page
- To change the configuration parameters for this page
- To delete this page
- Content View
- To preview a particular revision
- To update this content (add a new revision)
- To cancel an update
- To remove old revisions
- To reconfigure this content
- Revisions Preview
- Updating Content
- Update Method
- Edit using WYSIWYG HTML editor
- Edit using a simple text editor
- Upload new revision in a file
- Point to file on server
- Point to URL
- Completing the Update
- Templates
- Libraries
Getting Started
There are two ways to enter the Website Manager:
- From an editable page preview, click on one of the content
management buttons. This will take you to the Website Manager screens
for that content. The
 button takes
you to an update screen, whereas the
button takes
you to an update screen, whereas the  button takes to you a revision management screen. You can also get
into the Website Manager from the menu bar at the top of the editable
page preview.
button takes to you a revision management screen. You can also get
into the Website Manager from the menu bar at the top of the editable
page preview.If you do not see these buttons in the editable page previews, that may be because your CMS is set up to use a different CMS tool for editable previews, such as MySite.
- From the Administrator Webtop, launch the Website Manager by
clicking on its icon:

Overview of the Website Manager
The website manager looks like this:
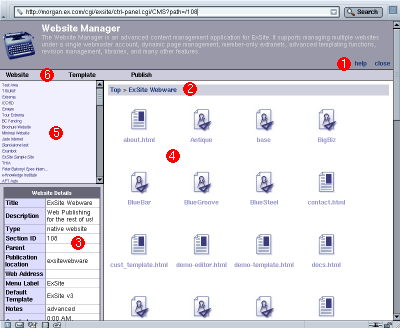
The important features are:
- Escape buttons: these are available on every screen, and close the Website Manager, or open up a help popup.
- Bread crumbs: this shows you where you are in your site and content hierarchy. You quickly navigate back out to higher levels by clicking on these links.
- Configuration: the left sidebar shows you configuration information about the site/page/content that you are currently viewing. This configuration data can be modified by selecting the configure option from the menu above.
- Content View: the content objects that are available from
your current location are displayed in the main part of the website
editor window. Normally they are shown as icons, but alternative
views are available in some cases. To work on a content object,
simply click on its icon. The different icons and their meanings are:
- Content Browser: related content, pages, and sites can be
seen in the small browser at the upper left. You can quickly jump to
other parts of the CMS here, rather than navigating solely through the
content view.
- Menu Bar: the options in the menu bar will change depending on where you are in your site and content hierarchy. These options allow you to reconfigure your site, pages, and content, add new content, remove old content, preview pages, and so on. The options that are available in the menu bar change depending on your permissions, so not all of the features described in this document may be visible to you.
In the content view area, you will find icons representing various types of objects in the CMS. Simple click on one of these icons to open up that object and view its contents:
 - a web site.
 - a web site template (a predefined site map that can be used to preconfigure new sites).
![]() - a web page.
- a web page.
 - a page template.
![]() - a content library (collection of reuseable content, such as images).
- a content library (collection of reuseable content, such as images).
 - editorial content (eg. body text)
 - design content (eg. images, stylesheets, templates)
![]() - a content revision
- a content revision
 - move back one step in the content hierarchy (eg. from page view to website view).
Content Structure
Web content has a nested structure:
- Websites contain Pages.
- Pages contain content objects.
- Content Objects contain Revisions.
This can be represented graphically as follows:

When you view your website content, you can view it at the level of a site, page, content object, or revision. The administration screens of Website Manager displays the contents of whatever "object" you are viewing, as described in the next section.
Editor Views
Your site's content can be viewed at five different levels:
- Top View: shows all of your sites
- Site View: shows all of the pages, templates, and libraries defined in a particular site.
- Page View: shows all of the content items defined in a particular page (or template, or library).
- Content View: shows all of the revisions of a particular content item.
- Revision Preview: shows a particular revision of a particular content item.
Your position at each level is displayed in the "Bread crumb" view, shown above. For example:
Top > My Website > index.html > body > 99
This means that you are in site "My Website", inside the "index.html" page, working on revision 99* of the page body. If you are not so deep into the content hierarchy, fewer levels will be displayed.
* Note that the "99" in this example does not mean the 99th revision of the page body. 99 is simply an ID number that is assigned to this revision of the page body. Every revision of every content item in the system is assigned a unique ID number, so they will not necessarily be sequential for a particular content item.
Top View
The top view displays all of the websites and website templates that you are permitted to work on. (Note: If you only have access to one site, and the CMS.skip_topview configuration parameter is set, then you will automatically be promoted to the Website View.)
To open a website to work on its pages:
Click on that website's icon.
To create a new website:
Select Websites > New site from the menu. This starts the Website Wizard, which leads you through the following steps:
- Website Details: provide a site title and description, and set the website type, which can be one of:
- native website: publishes to the default document root for the webserver
- stand-alone website: publishes to its own document root, but on the same webserver
- remote website: publishes to its own document root, on a different webserver
- website template: defines a set of pages that can be used to preconfigure a new website
- Location: specify this site's relationship to other sites in the system, and its publication location.
- Pages: select a website template to preload your site with pages from, and select a template to format those pages with. Templates may be previewed using the preview links.
- Webmaster: define who is permitted to manage this site. You can either create a new website manager account, or re-use an existing one. (You can also do both.) In either case, define whether the manager has editorial, designer, or administrator privileges. This determines which content items the manager is allowed to work with, and what operations they are allowed to perform on those items.
If there are websites in the system, but you cannot see them in the top view, that means that you haven't been granted access to those sites. See the User Management Guide for more info.
Website View
The website view displays all of the templates, pages, and libraries known to a site. It is the second level in the "Bread crumb" display.
To open a page, template, or library, to work on its content:
Click on the page, template, or library icon.
To view a structured site map instead of the icon view:
Select View > Site Map from the menu. Note that the site map is often handier for finding pages in a larger site site, but unlike the icon view, it does not show:
- hidden pages
- templates
- libraries
The site map view can be made the default using the CMS.pageview configuration parameter.
To change the site configuration:
Select Website > Configure site from the menu. This allows you to change the options that were originally selected in the website wizard, above.
To delete a whole site:
Select Website > Delete site from the menu. You will be prompted to confirm the deletion, with links to every database record that will be irrevocably deleted. Choose "Cancel" if you change your mind.
The Delete Site function cleans all site data out of the database, but does not delete files that have already been published to disk.
To create a new website that is a child of this website:
Select Website > New sub-site from the menu. This will lead you through the website wizard, as described above.
To create a new web page:
Select Website > New page from the menu. This will start the page wizard, which takes you through the following steps:
- Page Details: set your page's title, description, keywords, menu label, and configuration parameters:
- status: only active pages are treated as part of the live site. Inactive pages can be retained for working on, or for archival purposes.
- accessibility: pages can be publicly accessible, or restricted to members (logged-in users), or administrators.
- static/dynamic: determines whether the page is published to a flat HTML file, or is rendered dynamically on request. Note that restricted access pages must be dynamic.
- page visibility: determines whether you want the page to appear in site maps and auto-generated menus.
- parent page: determines where in the site map this page is placed.
You must also set the page's file name that it will publish to. Typically this is a name such as "filename.html", but if you want the published page to be run through PHP, it can be named "filename.php". The filename acts as a "handle" for the web page (ie. a unique name by which the page can be referenced), and so you must define it even in cases where the page is dynamic and not published to a file at all.
- Template: select a template to format this page with. You can preview the available templates, by clicking on the preview links.
- Body: you can select from a set of pre-defined page bodies, if any have been set up in this installation. If none have been defined, you will only have the option of a "normal body, fully editable".
Once the page is created, it will appear in the website view, and can be operated on normally.
To create a new library:
A library is just a place to store shareable and re-useable content (such as logos or generic images). Select Website > New library from the menu. Enter the basic configuration information for the new library, including a name, description, and directory name to publish the library files into.
Once the library is created, it will appear in the website view, and can be operated on normally.
To create a new template:
This is can be an involved procedure, depending on how complicated your template is, and how it relates to other templates in the system. Begin by selecting Website > New template or Template > New template from the menu. Full documentation is provided in the ExSite Templating Guide.
To change all pages in the site to a different template:
Select Template > Change for all pages from the menu. Select the site-wide template from the options presented.
To publish the site:
Select Publish > Publish site from the menu. It will report on the status of every file that is published.
Note: because ExSite dynamically determines whether to link to the static or dynamic revision of a file based on whether or not that file already exists on disk, the first time you publish a site, many of the site links will point to dynamic pages because those pages haven't been saved yet. To change these to the correct static links, simply publish the site again. ExSite will see the static web pages the second time through, and will point to those instead.
Page View
The page view shows all of the defined content elements in your page. It is also used to display the content elements in templates and libraries (which are treated internally as similar to pages).
For simple pages, you will only have a body element to manage. For complex templates, there may be dozens of images, stylesheets, scripts, and other elements to manage.
To preview this page:
From the View menu, select:
- Preview: display this page in a separate window
- Editable preview: shows the page, but with editing tools embedded in it, for easier content management.
- Non-editable preview: shows the page, but with editing tools explicitly turned off.
- Edit mode on: sets a flag so that editing tools will be embedded in not only this page preview, but also in every other site page that is navigated to from the preview.
- Edit mode off: un-sets the edit mode flag, so that you get normal previews instead of the editable previews.
To update a particular content element:
From the menu select Update > Update XYZ, where "XYZ" is the content element you want to update. This will lead you through the Update wizard. Click here for details on the update procedure.
To add a new content element:
Select Page > New content item from the menu. In the first step, you define and configure the new content element. The remaining steps follow the update wizard.
To publish this page:
Select Page > Publish page from the menu. This also works to publish the contents of templates and libraries.
Note: because ExSite dynamically determines whether to link to the static or dynamic revision of a file based on whether or not that file already exists on disk, the first time you publish a page, many of the site links could be left pointing to dynamic pages because those pages haven't been saved yet. To change these to the correct static links, republish the page once the other pages have been saved.
To change this page to a different template:
Select Template > Change Template from the menu.
To change this page to use a preconfigured body:
Select Template > Change body from the menu. Preconfigured bodies are not available in all sites.
To jump to the template used by this page:
Select Template > Go to template from the menu.
To change the configuration parameters for this page:
Select Page > Configure page from the menu.
To delete this page:
Select Page > Delete page from the menu. You will be prompted to confirm the deletion of the page and all associated records from the database.
Content View
The content view displays all known revisions of the selected content item, ordered with the most current revisions on top, and the oldest at bottom.
To preview a particular revision:
Click on the desired revision.
To update this content (add a new revision):
Select Update > Update from the menu. This will lead you through the Update wizard.
To cancel an update:
Select Update > Rollback from the menu. This will delete the most current revision, restoring the previous revision.
To remove old revisions:
Select Revisions > Clean Up from the menu. You can select which revisions to keep and which to discard.
To reconfigure this content:
Select Content > Configure content from the menu. This allows you to redefine the types of content that will be accepted, and the types of users who can work on this content.
Revision Preview
This view displays a particular content revision. Note that the content is displayed outside of the context of its page, so it will be drawn with different style rules than it normally uses, and may appear slightly different as a result.
To remove this revision:
Select Revision > Delete Revision from the menu.
To restore this revision:
To restore an older revision to the position of current revision, select Revision > Restore Revision from the menu. This creates a copy of the older revision, so the older revision also remains in its original position.
To edit this revision:
NOTE: to simply update the content, choose update. This makes a new revision. To change the details of the current revision (eg. to revise its mime-type), select Revision > Configure Revision from the menu.
Updating Content
There are several ways to update a particular piece of content:
- Click on a
 button in an editable page preview.
 - Select the item to update from the Update menu in the Page View
- Select Update > Update from the menu in the Content View.
- Creating a new content item will also lead you into the update
wizard after you define the basic content parameters.
Update Method
There are several methods for updating a piece of content, described below. ExSite selects the method that it believes is most appropriate for the context, but you can change the method using the update method selector. Warning: changing the update method will revert the content to the last saved revision. If you want to change the update method, do so before you have made any changes to the content.
Edit using WYSIWYG HTML editor
This method provides a rich text editor (WYSIWYG = "What You See Is What You Get") that gives you a lot of control over how your text is formatted.
The HTML editor has many features, which are documented in a ((Using the HTML Editor|separate help file))>.
Edit using a simple text editor
This method shows your text in raw mode, with all HTML tags explicitly displayed. This is useful in certain circumstances:
- The WYSIWYG editor cannot perform a certain effect, but you know how to do it manually
- You want to delete or edit some HTML tags that you cannot see directly in the WYSIWYG editor
- You are an HTML hacker who prefers working with raw formatting codes
- You are working on a template and need to work with CMS tags directly.
The editing functions in this mode are primitive, and may vary between browsers.
Upload new revision in a file
You can upload an entirely new revision of your content in a file, and it will completely replace the old revision. This is the normal method of updating images and other content that rests in external files.
Point to file on server
You can point to a file sitting on your webserver. This is not recommended, because the file is not in ExSite's control, and can be moved or changed without notice.
Point to URL
You can point to an external URL on a remote website. This is not recommended, because the URL is not in ExSite's control, and can be moved or changed without notice. There may also be copyright issues to deal with.
Completing the Update
After you have entered your new content, ExSite prompts you for some additional information to complete the update.
Content Type - ExSite makes an educated guess as to the MIME-type of the content you entered. It usually guesses correctly, but you should verify that it got it right, or your content may not render properly. One case where it can guess wrong is when you enter text without any special formatting or mark-up. In this case, ExSite doesn't have many clues to go by, and may choose "text/plain" or "text/html" -- double-check the result or your content may be oddly formatted.
Attributes - in the case of uploaded images, ExSite allows you to specify some optional attributes that can be included in the
tag. This can be used to, for instance, specify height and width attributes, borders, and so on. These attributes are only inserted if the image is referenced using the <!--&content(image-name)--> notation. If you use the
notation, then you are responsible for explicitly specifying all of your attributes.
Comment - ExSite maintains an audit trail of content updates, and a brief comment is required so that content managers can recognize the purpose and effect of each update. A default comment is provided if you have nothing special to say.
Templates
Templates are a complex subject, and are fully detailed in their own section of the ExSite Manual, Templates.
Libraries
A library is similar to a page in one respect - it holds content objects. However, a library has no public view, like a page does. It is an administrative tool that allows you to bundle related content for organization purposes. There are several reasons you might want to do this:
- store images, logos, etc. where the image tool can find them, and where they can be shared by multiple pages.
- store content that can be accessed not only by the current site, but also by any child sites.
- create image repositories that can be used as galleries or photo albums.
- create document repositories that can be managed similarly to photo galleries.
- manage collections of body templates for creating pre-formatted pages
Libraries are created from the website view, using the Website > New library menu option. Inside a library, new content objects are created exactly as in normal pages.
Libraries are automatically searched for matching content when the content is not found in the current page or its templates. The search proceeds through libraries in the current site, and then through libraries in the parent site, and so on.
Libraries are automatically published to disk when you select Publish > Publish site from the site view. When you reference a library content item, it will automatically use the disk revision, if it is available, but will resort to the internally stored database revision if not.
Libraries of pre-formatted page bodies
When you create a new page, ExSite allows you to select from a list of page bodies to preformat your page contents. The default is a blank page, which may be edited using the standard update tools. You can add new preformatted page bodies into the system, to increase the options that are available in this list. The usual reason to do this is to include some preconfigured web application pages, which simplifies the process of creating advanced web application pages. Otherwise, the casual site editor must know how to select the appropriate web application using the web application tool, and provide it with appropriate parameters.
ExSite finds the list of preformatted page bodies by searching the libraries in the current and parent sites for all "body" content objects. To add a new preformatted body, simply create a new "body" content object in one of these libraries, and update it with some appropriate content. Be sure to give it a unique description, since that is how the bodies are distinguished in selector menus. The new body will be displayed in list of available page bodies, the next time you create a page, or select Template > Change body from the page view.
If you have a standard set of page bodies, it is a good idea to keep them all under a single library, to make them easy to find. One problem, however, is that when you open this library, you will see numerous content objects with the same name ("body"). However, if you mouse over each body, you should see a tooltip distinguishing each body.
Libraries as image galleries
Libraries can optionally be used as image galleries, if you want those images to benefit from the full features of the content management system. The images can be referenced individually, using the image tool. If you want to view them all at once, you can use a Photo Album web application that does this job.
Libraries as document repositories
Libraries can be used to store documents or other files that don't normally display directly on the web (eg. spreadsheets, PDF files, zip archives). In your document library, simply create a content object for your document, give it an appropriate name, and upload the current revision of this file.
A link to download the document or file will be automatically inserted into your pages wherever ExSite encounters the content management tag:
<!--&content(document-name)-->