Survey Module
Introduction
The Survey Module lets you add forms and survey pages to your website which users can fill out. The module can automatically send the results to an email address as well as saving them in a database.Visual Tutorials
Info
Creating a new survey
When you first enter the Survey Module, click on the Add New Survey icon. The New Survey window is separated into two sections:
- Survey of Settings
- Contact Information
Survey Settings
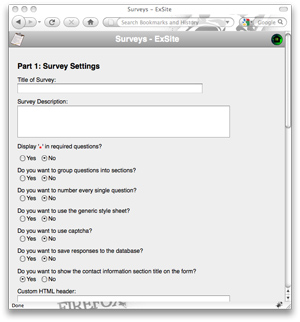 The Survey Settings section contains the basic operating settings for the form you are creating. These are:
- Display '*' in required questions? - By clicking Yes in this field, the Module will place an asterisk at the end of each mandatory questions.
- Do you want to group questions into sections? - Clicking Yes will turn on the Sections titles. This makes it possible to title different sections of the form, making it easier to organize and easier for the user to fill out.
- Do you want to number every single question? - Click yes if you would like all of the questions numbered.
- Do you want to use the generic style sheet? - Clicking yes will implement a basic stylesheet to the form. IE: It will enlarge and bold the title of each section.
- Do you want to use captcha? - This gives you the option of adding a "captcha" field at the end of your form. This will greatly reduce the number of "spambots" that could potentially fill out your form and send you spam.
- Do you want to save responses to the database? - When users click Submit after filling out the form, the answers will automatically be emailed to a user-assigned email (explained later), but by clicking yes in this field, it will also store the answers in a database.
- Do you want to show the contact information sections title on the form? - This will add a title for the section containing all of your contact information questions (see below).
- Custom HTML header - Any data entered in this field will add a section under the title of the form. Warning: this field only accepts HTML language, so only administrators with familiarity with HTML should use this field.
- Custom HTML footer - Any data entered in this field will add a section at the bottom of the form. Warning: this field only accepts HTML language, so only administrators with familiarity with HTML should use this field.
- Thank you message - Here you enter the text you would like the user to see after he's hit the Submit button. This is usually a standard Thank You message.
- Organization Email Address - Here you enter the email address you would like to show in the "From" field in the email that contains the results of the survey taken.
- A list of email addresses to send Survey results to - In this field, enter all the email addresses that you would like the survey results to get sent to. If more than one email address, separate the addresses with a comma.
- Redirect Message - Use this field if you would like to add a link at the bottom of then Thank You note. ie: Take me back to home page.
- Redirect URL - This is the actual URL address for the above text.
Contact Information
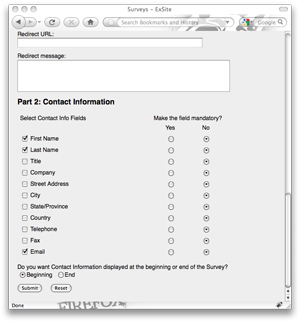 The Survey Module comes with built-in commonly used contact fields that can be quickly turned on and off. You can also easily set the the questions up to be mandatory or not.
To include a certain question in the form you are building, click on the checkmark to the left of the Contact Info Fields. Once you've selected all your fields, decide whether you would like them to be mandatory or not. Simply click Yes or No to the right of the Field to setup each question.
Do you want Contact Information displayed at the beginning or end of the Survey? - This setting gives you the option of placing the Contact Information block at the very beginning of the form, or at the very end.
To finalize the form and save your settings, click on the Submit button.Adding Survey Sections (if applicable)
- Click on the Add New Section icon on the bottom right of the Survey Sections box.
- Enter the Title of the section
- Decide whether you like the section title to be formatted as a heading or a question.
- Assign the rank of the question ie: will the section be towards the beginning of the form or towards the end.
- Click on Submit
Adding Custom Survey Questions
- Click on the Add New Question icon on the bottom right of the Survey Questions box.
- Select the Section where the question belongs
- Type in the actual question under the Label field
- Select what type of question it is. The options are:
- Checkbox
- Multiple checkboxes with a selection limit
- They choose from a list of answers
- Any short answer
- Long Answer
- Radio button
- Hidden question
- If you've selected Multiple Checkboxes, Radio Button or Drop Down List, enter the list of possible answers. Each answer should be separated by this character: | (shift+backslash on most keyboards).
- If you've selected Multiple Checkboxes, decide whether you would like an "Other" input field, where the user can enter an answer not included on the provided list.
- if you've selected Multiple Checkboxes, provide a number for a selection limit. ie: How many answers are allowed to select?
- If you've selected Radio Button or Multiple Checkboxes, decide whether you would like the answer choices to be displayed Horizontally or Vertically.
- Determine whether you would like this particular question to be mandatory or not. If a user does not answer a mandatory question, a warning will popup after he hits the Submit button, asking him to answer the question.
- Assign the rank of the question ie: will the section be towards the beginning of the form or towards the end.
- Click on Submit
- Repeat for every question you would like added to the form.
Editing a Survey
- Click on the Reconfigure icon to the right of the Survey you are editing.
- To edit the Survey Settings
Click on the Edit icon on the bottom right of the Survey Form Information box. - To edit the Contact Questions
In the Contact Questions box, click on the Edit Record icon to the right of the question you are editing. - To edit the Survey Sections
In the Survey Sections box, click on the Edit Record icon to the right of the section you are editing. - To edit Survey Questions
In the Survey Questions box, click on the Edit Record icon to the right of the question you are editing. - To reorder questions and/or sections
Reassign the numbers on the Question Rank next to the questions/sections. Once all the questions/sections have been numbered, click on Save Question Rank.
Reports
To view the results of any Survey, click on the View Reports icon to the right of the Survey.
- Click on the View Report:Participant icon to view a list of all respondents. You can export this list by hitting the Excel icon on the bottom right of the table.
- Click on View Report:Summary to view a summary of all the survey results. Each table represents a different question. You can view a breakdown of the results by click on the View Details icon on the bottom right corner of each table.