Event Manager
Introduction
The ExSiteâ„¢ Event Manager assists you in promoting and managing your event online. You can configure an online system to accept registrations, set up a website to promote your events, and manage an automated email notification system, and review reports on payments, registrant info, and other details.
The typical event proceeds as follows:
- Set up your event and its registration rules.
- Create a website to describe your event and accept registrations.
- Direct your potential registrants to this website using e-mail invitations or other methods.
- Interact with the event manager to manage the incoming registrations and review reports.
This procedure is described in greater detail later in this document. First, you should review some terms that we use regularly, to clarify their meanings (see Glossary).
Glossary
ActivityActivities refer to sub events that take place during the event. Activities can be grouped into different activity types.
Calendar
Calendar displays a list of up coming events. It also gives users options to view event details and a link to register for events.
Event
An event is typically a conference, meeting, expo, or other gathering for which individuals or groups must register to attend. It is the primary entity to which everything else (registrations, merchandise, email notifications, etc.) is associated. Events can encapsulate sub-events (called "Activities"), which are optional parts of the event, and may also require separate registration.
Facility
Facilities refer to venues that host events. A facility may be a convention center, a hotel, a hall or other location.
Fee
Fees are event registration fees and they are used to categorize the registrants.
Event organizers may set up multiple fees for an event when an event is required to take registration of different registrant types. For example, a member of an organization should register for the member fee and a guest should register for the guest fee.
When a registrant is registering for a multi-fee event, the system would display a screen with a list of available fees that allow registrants to choose the fee category they are interested in registering for.
Fees also determine the amount a registrant has to pay to attend the event. Each fee has options to enable or disable Early bird and Late fees, which allow the system to charge registration fee based on the date of registration.
Filter
Filters allow organizers to send email notices to a group of registrants that match the filter keywords.
Guest
Guests are additional people/registration spots that a registrant may purchase during the registration process.
Invoice
An invoice summarizes all purchases made by a registrant.
Mail-merge
Mail-merges are placeholders that can be used in notification and invite emails. Mail-merges appear in the format: [[name]]. The system substitutes mail-merges with personalized event and registrant data in emails.
Merchandise
Merchandise is event related goods, which can be purchased at the time of registration. An example of merchandise would be t-shirts.
Notification
Notifications are canned emails that are sent automatically by the system.
Payment
Payments are made for registration fees plus activity fees plus merchandise purchases. All of these can be purchased at the time of registration. Payments can be made several ways, including online, by mail or fax, or at the event itself. Payments are recorded and tallied using the online tools.
The Event Management Process
Setting up the Event
Create a New Event: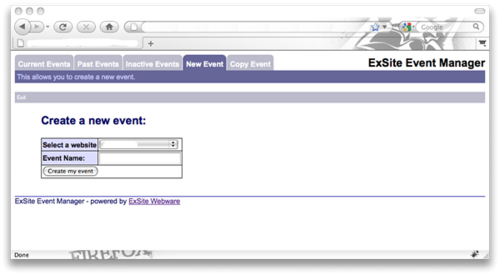
Click the New Event tab in the Event Manager:
- Select a website in the Select a website drop-down list. Note: You must select a website so the system knows which website you are promoting your events.
- Enter a name in the Event Name field
- Click Create my event
Select an event from the Current Events, Past Events or Inactive Events tab and click on the event name.
Basic Event Configuration
Main Details (Main Details > Main Details)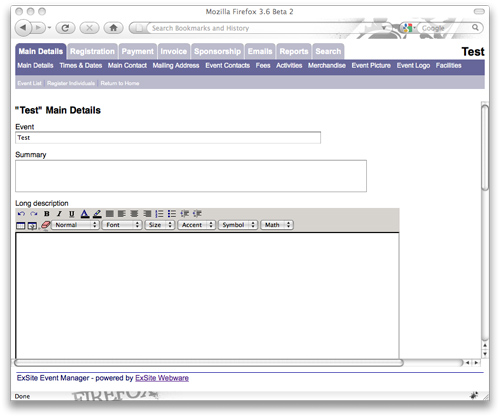
This screen contains a form that allows you to add information that will be displayed on the Event Details web page.
The first field, Event, should contain the title or name of your conference, meeting or event
Text entered into the Summary field will appear as a brief summary under the event title in the Calendar. The Long Description will appear on the Event Details web page after the viewer clicks on the linked event title.
If you set a rate in the GST or PST field, the system will apply tax on invoices.
The Invoice Identifier allows you to specify a text string that gets added to the invoice number (for book keeping purposes).
The GST label and GST number allow you customize the appearance of GST information on the invoice. If these fields are not set, the system will use a pre-set GST label and number on the invoice.
For the new event to be displayed in the Calendar, the Status must be set to Active. Click and hold your mouse cursor on the arrows to the right side of the pull down selection list. Scroll down the list and release your mouse over the appropriate selection.
Events are displayed in the Calendar only until the End Date, after which the Status is automatically changed to Past and the event is no longer displayed on the website. Similarly, please note that New Events with an End Date set in the past will not be displayed on the Calendar web pages.
Selling Status setting controls whether or not the register link is displayed next to the event title on the Calendar and the Event Details page.
The Selling Status drop down list contains four options:
- Open registration: the register link is displayed and online registrations are accepted
- Sold out: the register link is displayed and new registrants may or may not be accepted depending on specific Registration Settings.
- No registration required: when an event is open to all and no RSVP or pre-registration is needed, or if you are still setting up an event and want members to be able to see the information that is already in the system but not register online yet. Otherwise you may start receiving online registrations before you are prepared to accept them! The website visitors may still view all the event detail pages, but the register link will be disabled.
- Registration closed: this will disable viewing of all event information on the website until the status is changed to one of the other 3 choices. The event will only appear in the webmaster view, not on the public website. This allows event organizers to set up an event as information becomes available without having to worry about readiness for online viewing.
The event list on the Calendar of Events page will display Wait List Only under the Space Available column if the selling status is set to sold out, otherwise the Space Available column will show the number of places still available (i.e., 250/300 when 50 places are already sold of 300 available spots).
The final pull down list for facilities will initially contain a warning message. Don’t worry about that for now, but you will have to come back to this form later after you’ve filled in the event facilities details.
Remember to click the Submit button to save event information.
Times & Dates (Main Details > Times & Dates)
The setup form gives you a space to indicate start and end dates and times. If an event takes place only between certain hours for the duration of the event, then you may indicate the start and end times. Otherwise set both start and end times to 12:00 AM and no times will be displayed on the web pages.
The registration start date is the date the system will begin to accept online registrations.
Click the Submit button to save event information.
Main Contact (Main Details > Main Contact)
The main contact will usually be the person organizing the event or in charge of the website. Often it is your organization’s event coordinator, secretary, treasurer or person accepting registrations on behalf of your organization. This information will appear on the registration confirmation emails so that registrants will have someone to contact should they encounter trouble with the online registration or payment process.
Note: If you have several people who are coordinating the event, you can add them later by choosing the Event Contacts link in the left menu. This additional contact information will be displayed on the Contacts List page of the website only.
Click the Submit button to save event information.
Mailing Address (Main Details > Mailing Address)
The mailing address will appear on the registration confirmation forms to assist registrants who are mailing or faxing their registrations.
Click the Submit button to save event information.
Fees (Main Details > Fees)
This screen shows you a list of registration fees for the event. You may use the Delete icon to remove a fee from the list or click on the name of a fee to edit. To add new fees, you must click on the Add New Fee link.
Add/Edit Fees
For the Name of fee, choose something descriptive to help registrants choose an appropriate registration category, as they would normally appear on your registration form.
Fee amounts may be set to zero dollars for categories such as spouse or child who will not be attending the main event, but may attend some social activities. Another zero fee category could be for your speakers or sponsors.
Fees may have zero or even negative values if your organization incorporates meeting fees into its annual dues and includes a credit amount intended to be applied to social events.
You may set up different registrations fee based on the registration dates by enabling Early-bird or Late fees.
Early-bird Registration and Late fee Registration
When early-bird registration or late fee registration is enabled, the system will use the specified date to determine the fee to charge registrants.
For early-bird registration, the early bird cut-off date determines when to stop charging registrants the early-bird fee.
For late fee registration, the late fee start date determines when to start charging registrants the late fee.
Activities (Main Details > Activities)
This screen shows you a list of activities and activity details such as title, synopsis, start date, end date, maximum enrollment, status and image.
The Add new activity link allows you to add a new activity. Clicking on the name of the activity allows you to edit activity information. The delete icon allows you to remove from the event. To change the status of an activity, you use the archive command.
The archive command
Click the grey circle/arrow to archive an activity that has been canceled but that you may wish to use in future. The status will update in the Status column. When archived, events will not appear on the web pages or in the registration forms. To retrieve an event from archives, simply click the icon again. The status will update to active and the event will reappear on the web pages and registrations forms.
This feature is useful if your organization has many of the same activities at every annual event. Those that may not be offered one year may be removed from view only to be reactivated when needed the following year, without having to fill in the form again.
Add/Edit Activity
The Name of fee is what will appear on the final invoice. If there is a separate activity fee in addition to the main registration fee, enter it in the second field. If there is no fee, enter a zero.
You can set up custom categories for your activities using the Activity Type field. Some suggestions might include Scientific program, Social program, Children’s activities, Spouse program, etc. The system will automatically sort your activities by type when displaying them in the registration forms. To help you remember the activity types, once you’ve set them up they will appear in the Activity Type pull down list for easy selection for each subsequent activity.
The Synopsis field gives you space to enter an abstract or brief description of the activity.
The Location pull down list will contain all the facilities that you’ve previously entered. The other fields are useful for entering other location or meeting information such as describing the area to gather to meet a bus for a tour, for instance.
When appropriate, you may also enter website addresses, upload photos or maps, and indicate dates, times and maximum enrollments. When registrations for an activity reach its maximum enrollment number, the activity will no longer appear on the registration form, so no further registrants can select that activity.
Don’t forget to click the Submit button to save each activity.
Custom Questions (Registration > Registration Questions)
This tool allows the event organizers to design custom questions that will be included on the registration form.
The questions can have free-form text boxes for a long answer, or may take the form of a drop down list with specific choices. If the latter format, then the Yes button must be checked to indicate that the question has limited answers, and the answer options must be provided in the Answer Options field. Separate each answer option with a vertical bar ( | ) character (usually found on the right side of the keyboard).
There is also a pull-down list to specify which group of registrants will be asked this question (the list comes from the fee categories you created). Examples where this may be useful is to ask a registrants to indicate the ages of accompanying children to help organizers plan appropriate age-related activities, or to allow a registrant the opportunity to indicate if there are special accessibility or dietary requirements.
Answers to these questions are tallied in a report available in the Reports section of the application.
Payment Methods (Payment > Payment Options)
This screen allows you to select the type of payment this event accepts. They are: purchase order, pay at event, mail in cheque and fax. The selected payment methods will appear on the payment selection screen of the registration form.
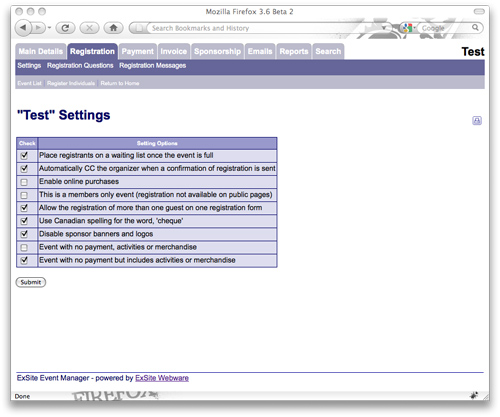
Registration Settings (Registration > Settings)
Registration settings screen allows you to configure your event with different settings.
- Place registrants on a waiting list once the event is full: Enable the system to accept wait list registrations
- Automatically CC the organizer when a confirmation of registration is sent: Event organizer would receive a copy of the registration confirmation email
- Enable online purchase: Enable registrants to purchase merchandise/advertisements at the time of registration
- This is a members only event: Registrants are required to be a member of a website to register for the event
- Allow the registration of more than one guest on one registration form: Enable the registration of multiple seats to one registration
- Use Canadian spelling for the word, 'cheque'
- Disable sponsor banners and logos: Enable this option if you don't require sponsors to upload their banners and logos.
- Event with no payment, activities or merchandise.
- Event with no payment but includes activities or merchandise
Activating the Event
To activate an event, you need to set the status (Main Details > Main Details) to 'Active'. Ensure that:- Event dates and times are configured
- Payment methods are configured
- Event pages are created
Event Promotion
Setting up your event in the Event Manager is only part of the process. You also have to drive potential registrants to the event registration forms. The Event Manager assists you with your event promotion and marketing in two ways:
- Easy creation of web sites and web pages to promote your event(s)
- E-mail marketing
Making Event Websites
Creating and managing a website is done using the ExSiteâ„¢ content management tools. To create and configure new sites, use the Website Manager. To perform simple website updates, and to add/remove pages from your sites, you can use the simpler MyWebsite Module. Details on using these tools are provided in other documentation, but the basic procedures are outlined below.Creating Special Pages
Once you have a website configured to promote a particular event or event series, you can add any number of pages to the site. Examples could be:
- lengthy description of the event
- schedules/agendas
- driving directions
- information for out-of-town visitors
- photos of past events
- testimonials
- and any thing else you feel might be useful or interesting
Setting up the Event Details Page
It is easy to create a page that links directly into the Event Manager, linking the viewer to all of your event details and the registration forms. Use this procedure:
- Create a web page to hold the event manager's information screens.
- Edit the page body, just as if you were going to enter free-form web page text.
- Instead of entering any text, choose the web application tool from the toolbar.
- Select "Event Manager" from the list of available web applications.
- Select your event from the options (choose the "Mail Details" screen). An icon will appear in the editor, representing the Event Manager.
- Save your page.
When the page is previewed or published, the Event Manager will take over the creation of content for this page, and provide the viewer with event information, registration links, and various other options.
Other Event-related Pages
You can follow the same procedure as above to create other views into the Event Manager's screens. The "Main Details" option is only one of several views into your event that you can choose. You can also go straight to the registration form, for instance. If you have a general-purpose event website, you may find the default view (Event Calendar) to be useful, for instance. It displays a list of all upcoming events, and allows the viewer to select the one of interest.
E-mail Invitations
E-mail invitations are an important way of promoting your event to potential attendees. If you have a list of potential attendees that you want to contact about your upcoming event, you can import the email list into the system under the email tab (instructions are provided).
One common way of promoting an event, is to contact everyone who attended the previous version of that event. The Event Manager assists you with this, as follows: To create a follow-up event, use the copy event feature. This not only clones all the setup information on the event, but also creates email lists for all of the original event's registrants and sponsors. You can use those email lists exactly as described above, except that no importing is required.
To set up e-mail invitation, you should setup up an email list (see Email List Report, Emails > Email List, for more information), then use the Send Invite (Emails > Send Invite) tool to send out email invites.
Managing the Registration Process
Notifications
There are four notification emails the system can send out. They are listed on the Confirmation Emails Report (Emails > Confirmation Emails). They are:- Confirmation of registration: this email gets sent out automatically right after a registrant has completed the registration process.
- Payment confirmation: this email gets sent out when a registrant’s payment status is set to any of the paid status.
- Your invoice: this email gets sent out when the Send Invoice command on the Invoice Report is used.
- Waitlist Confirmation: this email gets sent out when a wait listed registrant has completed the registration process.
You can also add your own confirmation emails using the New Confirmation Email link. However, your confirmation emails won't be used by the registration system, but they can be used as email template and are available on the Select a email template drop-down list in the Send Invite tool.
Modify Notifications (Emails > Confirmation Emails)
Click on the name of the email to update confirmation emails.
The Subject field allows you to define the email subject.
The Description field lets you to provide a description for the confirmation email.
The Body field allows you to enter the email message.
Note: The body of the emails contains mail-merge fields. A mail merge code allows you to personalize your email message. Place these codes anywhere you wish to have information that needs to be drawn from the database.
Registrant Merge-Fields:
[[honorific]] – registrant honorific (e.g., Mr., Mrs., Ms., Dr.,…)
[[first_name]] – registrant first name
[[last_name]] – registrant last name
[[organization]] – registrant organization
[[address1]] – registrant address line 1
[[address2]] – registrant address line 2
[[city]] – registrant city information
[[state]] – registrant state/province information
[[zipcode]] – registrant postal code
[[telephone]] – registrant telephone number
[[email]] – registrant email address
Event Merge-Fields:
[[logo]] – event logo
[[event_name]] – event name
[[name]] – event name
[[start_date]] – event start date
[[start_time]] – event start time
[[event_date]] – event date
[[event_email]] – event contact email
[[contact_name]] – name of the event contact
[[eventphone]] – event contact phone number
[[eventorganization]] – event organization
Reports
User Reports
These reports are formatted to display all registrants, registrants by registration category, or by activity. Other reports include sponsors and guests.On each report, you may click the name of the registrant to view their full registration details. You may delete the registrant by clicking the “X†icon or you may send a personal email to a registrant by clicking the Email Address link next to their name. A small window will open that is pre-addressed to the registrant and gives you space to type a subject and text message.
Registration Summaries
These reports show the revenue and registration summariesRegistrant Details
Answer to questions report shows you registrant answers for all custom questions. It also allows you to view answers by specific question.Closing Registration
If you wish to close registration anytime before the event is over, you need to set event's selling status to 'registration closed'. (See Completing the Event for more information)Waiting Lists
If you wish to continue accepting registration after all the available registration spots are filled, you should enable wait list registration. To enable wait list registration, you need to turn on 'Place registrants on a waiting list once the event is full' from the Registration Settings screen. When this option is enabled registrants would be placed on the wait list. You can view all wait listed registrants from the Waitlist Report.When there are more spots opened in a sold out event, you may want to move registrants off the wait list. To move a registrant off the wait list, you use the Move command on the Waitlist Report. Once a registrant is moved out of the wait list, he/she will be officially registered for the event and his/her registration would appear on the Registration Report and remove from the Waitlist Report.
Managing Payments and Invoices
Payments can be managed using the Payment status report (Payment > Payment Status Report).On the Payment Status Report, you can use the Type drop-down list to view registrants by their payment status.
To change registrant's payment status, you use the Payment Info drop-down list.
You can view invoices on the Invoice report. Invoice report allows you to preview invoice, send invoice, edit invoice, view notes and delete registrant.
To email registrant invoices, you should use the send invoice button.
Edit invoice command allows you to modify invoice information. When you change fields in an invoice, the changes will appear on all invoices in the event. To preview the changes, you can use the preview invoice command.
Completing the Event
Once an event is over, the system will automatically disable registrations and display a message on the registration page informing registrants that the event is over and no longer accepting registrations.If you don’t want to use the default system message on a completed event, you should update the registration form page with your message and remove the EventMGR application by deleting the EventMGR icon from the WYSIWYG editor (this step is optional).
Special Modules & Features
Custom Reports
The custom report tool shows you a list of custom reports. To view custom reports, you can use either the View icon or click on the name of the report. To delete a report, use the Delete icon. To edit a report, use the Edit icon.Add New Custom Reports (Reports > Custom reports > New custom report)
To add new custom report, click on the New custom report link.
Part 1: Report Info
The Name field allows you to give a name to the report.
The Description field gives you space to describe your report.
Part 2: Report columns
Under Registrant information section, you should see a series of check boxes. These check boxes represent the columns that you can select to appear on the custom report.
Note: If you have created custom registration questions, you should see a series of check boxes under Custom Question section, which allows you to add columns to display answers to custom questions. The Custom Question Section will not appear if you don’t have any custom question created.
Part 3: Filters
You can enter keywords (one keyword per input field) in Filter fields and select what type information you want to filter for using your keywords on the drop-down list beside the Filter field.
E-commerce
E-commerce feature enables the registration system to accept online payments through payment gateway providers.Sponsor Packages
This feature enables an event to sell banner and logo spaces to advertisers through sponsorships. You can also create sponsor pages displaying sponsor images. Sponsor logos and banners can be updated through the Event Manager interface.The Sponsor Package report shows you a list of available sponsor packages. This report allows your add new sponsor packages with Add new sponsor package link, remove sponsor package with the Delete icon, register sponsor with the Register icon and update sponsor packages by clicking on the name of the package.
Add New Sponsor Packages
The Fee name allows you to give a name for the sponsor fee.
The Fee field lets you specify the cost.
The Package name field allows you to give a name to the sponsor package.
The Description gives you spaces to enter a description for your sponsor package.
The Number of Registrants allows you to specify the number of free registrations a sponsor registration would get.
The Type field lists a series of check boxes. These check boxes determine what the system will do with sponsor logos and banners.
- Mention on our Sponsors Page: The system would show sponsor names and logos on the sponsor page.
- Full promotional web page: The system would link sponsor name and logos to full promotional pages.
Received Materials
Received material report enables you to manage registrant's shipping goods. The drop-down list on the status field allows you to adjust the status on the fly.Recycling Old Data
Cloning Prior Events
The Copy Event tab in Event Manager enables you to clone an existing event.The system will copy the following data to the new event: event information, contacts, fees, activities, merchandise, facilities, sponsor packages, email notification, emails and filters.
To clone an event, you need to select an existing event from the Select a website drop-down list and provide a name in the Event Name field.
By default, a cloned event is set to Inactive.
Once the event is cloned, the system would take you to the Main Details screen of the cloned event.
Email Marketing to Previous Event Attendees
During the event cloning process, the system would create a past registrant email list and a sponsor email list from the event that is being cloned. These email lists will get added to the email groups in the cloned event.To send out marketing emails, you can use the Send Invite Tool and select a list of imported registrants from the Email List drop-down list.