Photo Albums
Photo Albums
 The Photo Album plug-in gives you a convenient and easy-to-use interface for managing your website images and photo collections. This document describes how to manage multiple photo albums and use the images in your web site.
About Libraries
The ExSite CMS uses libraries to store collections of re-useable content. Libraries are similar to folders on your computer. A particular library might hold images, or documents, or movies, or some other kind of file, or a mix of these. You can view and manage your library content using the standard CMS tools (such as My Website), but there are also specialized tools for managing particular types of libraries. (For example, the Document plug-in is used for managing libraries full of down-loadable files.)The Photo Album tool is basically a specialized library manager that is designed to manage photos. From the point of view of the Photo Album tool, a library and an album are effectively the same thing, although you could say that albums are libraries that contain photos, whereas regular libraries might contain other types of files that the Photo Album is not good at managing. But since you can also mix photos in your other libraries, the Photo Album tool will allow you to choose any library to open.
Browsing Albums
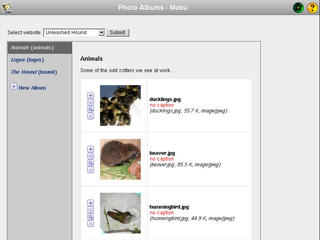
When you start up the Photo Album tool, you will first select the site or section you want to work in. Then the libraries in that section will be shown in a list down the left side of the control panel. Simply click on one of them to open it. To create a new album, use the "New Album" button at the end of this list. (This essentially creates a new library for you.)When you select the album, all of its photos are displayed in thumbnail form. If there are many, you may have to scroll to see them all. Additionally, a summary of non-image files in the same library will be printed out, so that you are aware of other files that might be sharing the album.
To view a full-sized image, click on its thumbnail. The image will pop up in a new window, at its original size.
Adding Photos
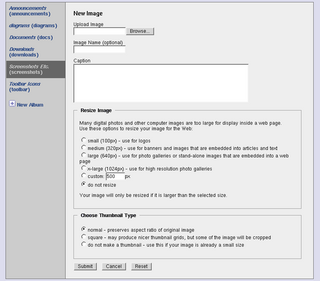
At the end of the thumbnails are some links to manage the album, including a link to upload a single photo (new image), and a link to upload multiple photos (bulk upload).For a single photo, you are asked to provide the file, a name, and a caption. The name is optional, and is how the photo will be named in selectors in the CMS. It defaults to the file name if you do not specify anything, but you can change it if you like. (For example, if the file name is something messy like Acme_Logo_500x300_RGB_for_brochure.jpg, you might want to change this to just "logo" or "logo.jpg" in the name field.) The caption is also optional, and is used by some (but not all) image viewers (see below).
 You also have the option to resize the photo. This is important if the photo came from a digital camera, since the original size is too large for the web. A set of suggested sizes is shown, namely:
- x-large - too big to insert into most web pages, but good for high-res popups
- large - can be inserted into many web pages, but it will take up the whole body
- medium - can be inserted into web pages, and is small enough to have text flow around it
- small - good for logos, icons, and other graphics
The Photo Album will automatically create a thumbnail of the image (a duplicate of the image, but only 100 pixels across), which is useful for photo galleries. The thumbnail is what you see when you view the entire album in the Photo Album tool. If there is no thumbnail, the Photo Album simply scales the original image down to thumbnail size, but this is slow and takes longer to load than a real thumbnail. You have a few choices of thumbnail style:
- normal - the thumbnail will have the original shape of the image, preserving all of the original image contents
- square - the thumbnail will be perfectly square - this might crop the edges of the image, but will result in tidy thumbnail galleries
- no thumbnail - no thumbnail will be created
Using the bulk upload link, you can upload up to 10 files at a time, and apply the same image size and thumbnail options to all of them.
Revising Images
After images have been loaded, you can go back and update many of their attributes, including their captions and thumbnail types. Use the tool buttons beside the thumbnail in the album view.You can also upload new replacement images, if a better version comes along. If you upload a new image, the new one will replace the old one everywhere in the site, once the site is republished. However, the old one is still kept in the system's revision control, and you can roll back to it later if necessary.
When you redo a thumbnail, it starts from the original image, so you can switch back and forth between normal and square thumbnails as often as you like. You can redo all thumbnails in an entire album if you want to have them all to conform to one particular format.
Displaying Albums
You can display albums in free-form content, or using an album viewer plug-in.Free-form simply means you select individual images from your albums, and insert them into free-form content where ever it suits you. Use the image tool in the HTML editor to select the images. You can optionally choose left or right alignment (which causes text to flow around the image), and you can set an image border (which is specified as a thickness, in pixels). Once the image is inserted, you can click on it and drag the control points to change its size. (Note that quality degrades at anything other than the default size.)
As an example, we used the free-form method to add the screenshot images to this article.
Photo Gallery
The Photo Gallery plug-in automatically formats an entire album as a thumbnail gallery. Choose the album you want to show, and that's it. The code to format all of the thumbnails and link them to their full-size images is automatically generated for you. The full-sized images will appear as pop-ups when you click on the thumbnails.
Example of a Gallery plug-in.
Slide Show
The SlideShow plug-in automatically formats an entire album as a slide show. It only displays one image at a time, but gives you links to step forward and backward through the slide show, as well as return to the start. The SlideShow also shows image captions.The SlideShow has options for generating different types of control buttons. If no buttons are chosen, then "next" and "previous" links are used instead.
SlideShows work particularly well with AJAX -- this is a technique for loading the next image without reloading the entire page. This gives a smoother and faster viewing experience. However, it can be jerky if the images are all different sizes, because the page will reformat itself to fit each image. If the images are preconfigured to be the same size, then the effect is much more seamless. To use AJAX, you should consult the Using Plug-ins guide.
Strip Gallery
The StripGallery plug-in combines aspects of the regular photo gallery and the slide show. It displays a strip of thumbnails, and the selected image is displayed in full in the viewing area.The StripGallery tries to preload its images for fast image switching, and rollover effects. This gives a slick presentation if your images are all configured to be roughly similar in size (so the page does not reflow every time a new image is shown), but it can take a long time to load a large album, especially for dial-up users.
The Strip Gallery has many tricks for setting up its presentation, for example, thumbnail strip below, image viewer above; or side-by-side; or strip and viewer in completely different parts of the page. The gallery can be configured as click-to-view or rollover-to-view. Setting up all of these different options is beyond the scope of this document.