Finances
In addition to your regular financial reports (using the Finance and Payments modules) you also have event revenues reports available using the Revenues tool. This tool includes the following views of your event revenues:
- By registration: shows each individual registration separately on its own line. Owing and paid amounts are shown in separate columns
- By registrant: shows each registrant on their own line, with their individual registrations listed in separate columns. Owing amounts are shown as debits.
- By Fee: shows summary totals (owing and paid) for every fee in your fee list.
- Combined Fees: similar to the previous report, but fees with a “Same As†setting will be aggregated together for simplification.
- Other Purchases: shows everything else on the registrant’s invoice that was not an event registration. If you want to see explicit purchases (such as membership renewals, merchandise purchases), not just surcharges like taxes, click the hide surcharges button.
Taxes
Taxes are charged based on a particular geographic location. By default event registration taxes will be charged based on the purchaser’s location, but this may be incorrect; you may need to charge taxes based on the conference location, regardless of where the purchaser is registering from. If so, you need to provide an event location so that the e-commerce subsystem knows the geographic location to use for tax purposes.You can select the event location using the sites/venues tool in the Event Calendar module. If the venue is not available in the listing, then you can add it to your list of venues in the Address Book module.
Note that your tax rules are defined in the Billing Adjustments module.
Alternate Tax Rules
You may need to use different tax rules for different fees. For example, some fees may be tax-free, or you may need a special registration category for organizations that are tax-exempt. To do this, you first need to have a special accounting code setup for these alternate tax rules. (For the tax free case, all you need is a NOTAX or OTHER accounting code, which has no tax rules associated with it.)To configure a registration fee to use a different set of tax rules, click on the fee name in the fees listing. Then click on the preferences button. The accounting code used for this fee can be selected here (it should default to the general event registrations accounting code).
You can use a similar principle to split your event reporting in the Financial Reports module. If you run numerous events, but would like to track your conference finances
separately from other events, then you should set up a special conference accounting code, and set all of your conference fees to use it.
Payment Methods
Under the fee preferences you can also set the preferred payment method for registrations in this fee. Two values are allowed, "invoice" or "e-commerce". You only need to set this on the main fees; once the users chooses a fee with a payment method preference, that preference will be remembered until checkout.
There is no guarantee that your preference will be honoured, however. If you setup contradictory preferences (eg. one item in the cart is supposed to be paid by e-commerce, but another is supposed to be paid by invoice) then the shopping cart will not be able to follow the preferences you have indicated.
Merchandising
You can optionally sell additional merchandise, services, or other sales during the event registration process. Typical examples include:- event shirts for attendees
- booth add-ons (tables, power, network) for exhibitors
- club rentals for golf events
Enable merchandising on your event under the event preferences. After you do this, a merchandise tool will appear in the toolbar. Click on this to manage your merchandise
options.
options.

In the merchandise tool you have the option to set up mini-stores for the whole event, or any of your specific registration types. If you set up an event store, then everyone in the event will be offered the merchandise. If it is only for a specific registration type, then only those registrants will be offered the merchandise. Click either the create store buttons or the go to store links to jump to the Catalog module to setup your merchandise items, descriptions, imagery, pricing, and options.
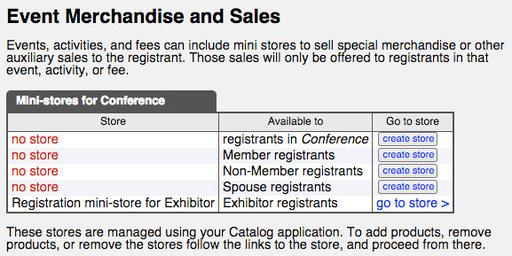
In this example, we have created a store for Exhibitors only, to sell booth upgrades.