Registration Limits, Selling Out, and Waitlists
The registration system will track number of tickets sold, and can automatically close registration when a limit is reached.
A ticket is counted as sold once the user checks out and completes their registration, regardless of whether they pay immediately (e-commerce), or opt to pay later (invoice).
To cap the registrations in an entire event, set the “Registration Limit†in the event description in Event Calendar. For example, a luncheon might be limited to 100 persons. To cap the registrations in a particular fee, set the “Registration Limit†on that fee. For example, Non-Member attendees at the luncheon might be limited to no more than 50% of the available seating (ie. 50 persons). In that case, the Non-Member fee would sell out if either of the following was true:
- 100 luncheon tickets were sold
- 50 luncheon tickets were sold at the Non-Member rate
You do not have to specify the limit for every single special case of the fee. If the special case has its “Treat As†setting set to point to the main case of the fee, it will use the registration limit specified in the main case. For example, if the regular Non-Member luncheon ticket has a registration limit of 50, and you also setup an early-bird Non-Member luncheon ticket, then make sure the early bird ticket is “Treated as†the regular luncheon ticket. Then it will automatically have the same limit.
Capacity Warnings
The system will display capacity warnings on the overview screen when capacity exceeds 90%. If you want emailed capacity warnings, you can set this up under the event preferences.
- Notify administrator after event is this % full: (eg. 90%)
- Send administrator notification to: (your email address)
Note that capacity warnings are emailed after every registration above this threshold, allowing you to keep tabs as an event fills up.
Selling Out
Once the registration limit is reached, the registration link automatically turns to “Sold Out†and no longer accepts new registrations.
If you did not put a registration limit on your event or fee, and need to close registration, you can either:
- set the registration limit to something less than or equal to the current registration count
- set the fee status to “sold outâ€
If at a later time, you increase capacity, simply reverse what you did (or set the new registration limit), and registrations will be accepted again.
Wait Lists
The wait list function allows people to register for events that are sold out. Their registration will be accepted, and placed on the roster in a “waitlist†state. Separate invoices will be created for these registrations, but will be left inactive, so nothing is owed.
To enable waitlisting, you must check off the enable waitlist when sold out option under the fee configuration. Any conditional fee cases that are treated as the regular fee will automatically inherit this setting, so you do not have to do this for every case.
To view your waitlist registrations on the roster, check the following roster options:
- include waitlist registrations
- include activities
You can then optionally filter the roster down to just the waitlist registrations by typing “waitlist†into the filter search box.
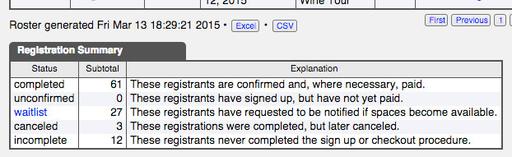
To manage the waitlist entries, click on the waitlist link in the registration summary at the bottom of the roster. If the waitlisted registrations are all in activities, you must go to the roster for just that activity first. (For instance, go to the event list, and click into the particular activity instead of the main conference.)
If there are waitlist registrations, the word waitlist turns into a link.
The waitlisted registrations are displayed in the order the waitlist registrations were received, earliest first. Click on a name to manage that waitlist entry. This will display information about the registration, information entered into forms, and any invoices connected to the registration.
If you just want to put them on the roster, and ignore the payment/invoicing issues (which you will presumably handle in a different way) click the Activate registration only link on the right side of the screen. This moves the waitlisted registrant onto the roster, but ignores the billing.
If you want proper invoicing and accounting for the waitlisted registration, then click the Activate registration and invoice link. If you choose this option, the invoice becomes active, and the amount will now become owing on the registrant's account. This is on a different invoice than the original paid invoice. (But it is probably the very next invoice #, or close to it.)
You may need to contact the registrant to arrange payment separately. Your options include:
- contacting them, arranging payment, and recording it manually
- click Go to invoice and use the email invoice function to send the invoice to the registrant
- if the registrant is a member of your organization and you have account management features on your site, they can go to their account page to find and pay the invoice there.
Activity Waitlists
If the waitlist is only on a particular activity, you will need to click into that activity first to find the waitlist. From the overview screen, select the activity, then view that activity's roster, and then select the waitlist from there.
Registrants on an activity waitlist may have successfully registered and paid for the remainder of their registration. In this case, they will have two invoices--one paid for their main event and any other activities, and one unpaid with their waitlisted registrations on it. Invoices will be shown in an accordion box, with unpaid invoices opened up for viewing. Simply click on the invoice numbers to view the paid ones as well.
Contacting your waitlist
As you accept registrants from the waitlist, they are moved off the waitlist and onto the main roster. These registrants should be contacted individually as noted above to arrange payment.
If you want to bulk email your waitlist, for example to announce that new capacity has been created for them, or to announce that you were unable to create that new capacity and their registrations will not be accepted, you can do this as follows:
Go to the Contact List tool, and create a new contact list for your waitlist registrants only. (If you are dealing with an activity, do this from the activity, not from the main conference.) Then use the email this list button to send a bulk email to this list using the Email Distribution module.
Note that this sends to everyone currently on the waitlist, not everyone who was ever waitlisted at one time. That means that as you accept waitlist registrations and move them onto the main roster, those registrants will disappear from your waitlist contact list. If you want to send to everyone (for example, to announce new capacity and outline the general process for payment), do this before you confirm your waitlist registrants. If you want to send regrets to the ones who did not make it, then do this after you confirm your waitlist registrants.