Registration Setup
Open Event Registrations, scroll to the bottom of the event list, and select show events without registration. Select your new event from this list, click on the fees tool, and then click the Setup registration button.
Registration Types
In the first section, enter each of your main registration categories. Examples of main registration categories are:
- member
- non-member
- sponsor
- student
- speaker
- spouse/partner
- etc.
For each registration type, enter the regular (non-early, non-late) cost, and select the registration form to use for this registration type.
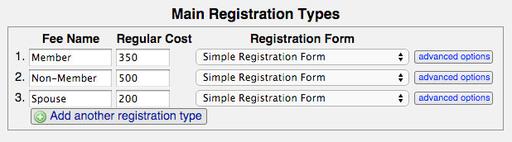
Setting up three main registration types.
Access Controls
You have a few tools to control who can use a particular registration category, available under the advanced options button:
Access: set to "members" to limit this fee to registered members of your site/ organization. If the user is not logged in, the site will tell them to log in first before they can register for this fee. Set the access to "administrators" to make this fee available only to your event staff.
Visibility: set to "hidden" to remove this fee from lists of your registration types. Users will need to be given a direct link to this fee in order to register for it. Only do this for main registration types, not for activities.
Password: the user will need to enter this password to register for this fee. You can use this to control access to special discounted rates.
Registration Limit: once this number of registrations has been accepted in this fee, the fee will be marked "sold out". This is different from the event registration limit; for example, a luncheon might be limited to 100 people, but the discounted student rate for the luncheon might be further limited to 20 people.
Time Exclusive: if this is checked, users will not be able to register if they are already registered in another activity at the same time. Use this to separate your parallel sessions into streams.
No Guests: if this is checked, users will not be able to add another registrant if they register for this fee. Use this to restrict registrations to one person.
Allow Multiple: if this is checked, registrants can register for a fee multiple times. Use this for cases like "extra tickets", where a person can purchase multiple tickets under their own name.
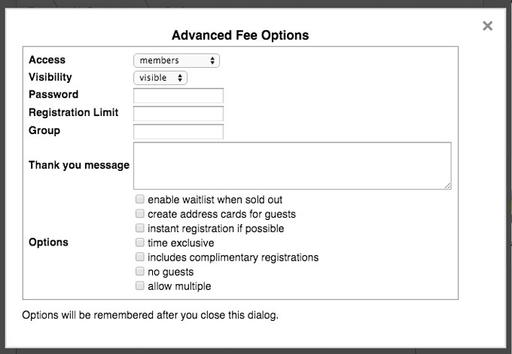
Setting the member fee access to members only.
Ordering
If you have a large number of fees, you have some extra tools to organize them:
Sortkey: when editing a fee, you can specify a particular sortkey to control how it is ordered with respect to other fees. During initial setup, they will automatically be sorted in the order you enter them.
Group: you can group related fees together in listings. Each group will have a heading, which is the group name. Examples of fee groups:
- Friday Sessions
- Saturday Sessions
- Stream A
- Stream B
- Sponsorships
You can also set fees to hidden so they do not appear in fee listings at all. Then you can setup special pages just for these special fees. Use the link button in the fee listings to obtain a public link to the fee. You can use these links to build your own custom fee listings. For example, you may not want your sponsorships to show up on the regular delegate fee listings; in this case, hide the sponsor fees, then build your own Sponsorships page to promote and link to these sponsor fees directly.
Fee Types
There are 3 types of fees you can set up, which differ mainly in how the user purchases quantities of registrations.
Regular
Regular registrations are meant to be purchased singly, and to be clearly distinguished from each other. This is typical of things like courses and conference registration, where each registrant needs to be clearly identified.
Ticket
Tickets are meant to be purchased in quantity, and do not need to be distinguished. That is, the purchaser can provide one name and registration form response, and all of the tickets will registered under that info (eg. 4 wine tasting tickets under "Jane Doe"). This can be useful when you just need to track numbers, and do not need to know personal details of every attendee. Events such as tours, meals, or shows may benefit from this approach if people are expected to buy multiple placements in these events.
If the fee type is set to "ticket", the purchaser will be asked to select a ticket quantity during the registration step. Those tickets will be added to the cart individually (ie. 10 tickets will produce 10 line items on the invoice).
You can also get similar behaviour using regular fee types by using the "allow multiple" option. After purchasing a single registration, the registration button will change to say "add another". Keep clicking it to add additional registrations one at a time.
Combo
Combo registrations allow you to select multiple fees in a single registration step. Typically, there will be a main event fee that includes certain activities at no extra cost, or there is a full-package registration type that includes all activities. Using regular fee types, the activities all have to be selected individually. With combo fees, they are all automatically selected and added to the cart.
To setup a combo fee, check off "includes combo registrations" in the main fee's options. Then, for each activity that should be included automatically, set the corresponding activity fee to "combo" type.
Note that this does not oblige the registrant to attend the activities, it only simplifies their registration process. They are free to remove the extra combo registrations from their cart if they wish.
Comp
Comps are a form of group registration, in which a company, team, or table can be registered at a single group rate, and numerous individuals included with it at no cost. The extra no-cost registrations are the comps. The procedure for setting these up is explained in more detail under Comps.
Registration Periods
Every fee can have a certain time period that is valid for. This can be customized for every fee, but typically it is used to specify overall registration deadlines.
Check off which registration periods you want to allow, and specify the open and close dates for each of them. If the next period begins immediately when the previous period closes, you only have to specify one. For instance, if you specify only the close date of early registration, and the open date of late registration, then the regular registration period will automatically fill the gap between them.
If you want to keep registration closed while you set things up, set an open date for your first registration period. If you want to close registration completely before the event starts, then set a close date for your last registration period. If there is no overall close date, then it will automatically close when the event starts.
Time is significant in these deadlines. If you leave the open time off, it will assume the beginning of the day in question; if you leave the close time off, it will assume the end of the day in question. These times are the time on your web server (Pacific time), not the local time at your office.
Cost Adjustments
The regular registration period uses the regular costs specified in the Main Registration Types section.
Early and late fees will automatically be adjusted according to the formula you enter in the cost adjustment field. You can specify the adjustment formula in the following ways:
| +N | adds N dollars to the regular cost |
| -N | subtracts N dollars from the regular cost |
| +N% | adds N% of the regular cost |
| -N% | subtracts N% from the regular cost |
| N | sets the fee to N exactly |
You will get a chance to review and adjust the recalculated fees manually, so it does not matter if your formula is exactly correct in every case.
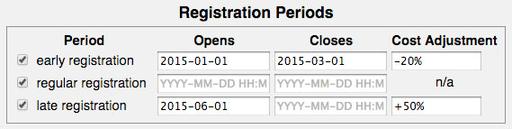
Setting up early registration (20% discount) in January and February, and late registration (50% penalty) in June. The regular registration period automatically fills in the gap, and late registration runs right to the start of the event.
Activity Registrations
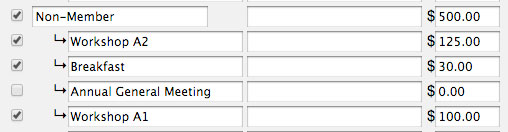
Make sure that every activity requiring registration is checked off. Activities that do not require explicit registration or RSVP should be unchecked.
Specify the costs of activities that have separate charges. Use the "adjust" option to also adjust these costs using the adjustment formulas in §3.2.1.
Under the advanced options, you can also specify access controls and other options, just as you did for the main fees. The "time exclusive" option is particularly useful for activities, since it will prevent accidental registration in two activities that occur at the same time.
In this example, all activities require registration, and all but two have extra costs. The workshop costs should also be adjusted for early/late discounts/penalties.
Note that you can include special registration forms for each activity, but by default no form is required since you already collected basic info on the main registration. Activity registration forms are typically used for things like:
- meal choices for luncheons, dinners
- equipment choices, handicaps for golf events
- etc.
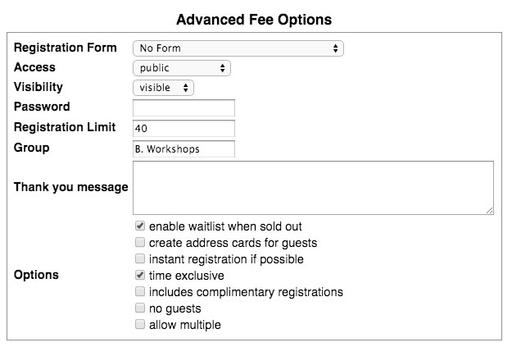
Activity options: in this example for one of the workshops, there is a registration limit, the fees should be grouped under a heading, users should be prevented from registering in conflicting workshops, and we will continue to accept registrations onto a waitlist if we sell out.
Registration Scope
By default registrants will register for the entire event. If the event is a conference that occurs over the course of two or more days, you also have the option of accepting partial registrations for single days. These can be discounted in the same way as in §3.2.1. Registrants in these days will be limited to selecting activities that are on those days only.
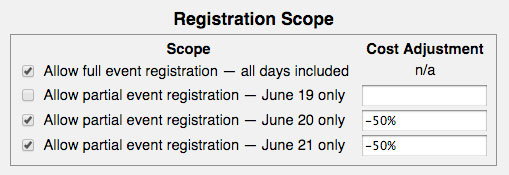
Example registration scope: single day registrations will be accepted for two of the conference days, at a 50% discount.
Review All Fees
When you submit the fee setup wizard, the system will calculate all of the possible combinations and permutations of the fees, registration periods, activities, and scopes that you have selected. This may produce a very large number of cases.
Every single case can be reviewed, have its wording edited, and its cost manually adjusted. You can also exclude cases simply by unchecking them. Examples of cases you might want to exclude:
- spouses or exhibitors may not be able to attend workshops
- non-members may not be able to attend meetings
- students may not be able to attend professional seminars
- early bird rates might only be offered to members
- sponsors do not pay late fees
- etc.
Example: non-members do not get to attend the AGM.
When you submit this review screen, your final fee selections will be created. If you got it all right, you are done. Your event is ready to accept registrations.
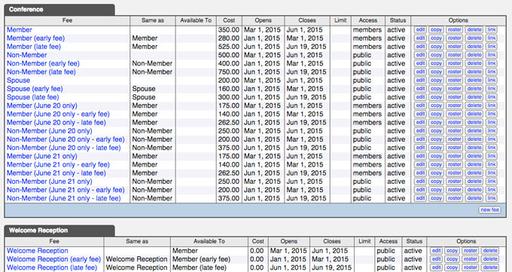
The final list of fees. There may be many cases, but each one can be edited and revised.